|
|
Goodness Gracious Munched!
Sunday night, 23 Jan 2005
|
A port - starboard incident with a Laser 11 caused a serious hole in the
port side of Louise's Fireball dinghy.
We will document the repairs here.
The damage was caused during the Sunday DMYC Frostbite, 23 January 2005.
With a bit of work and a bit of luck, we'll be back afloat in a week. |
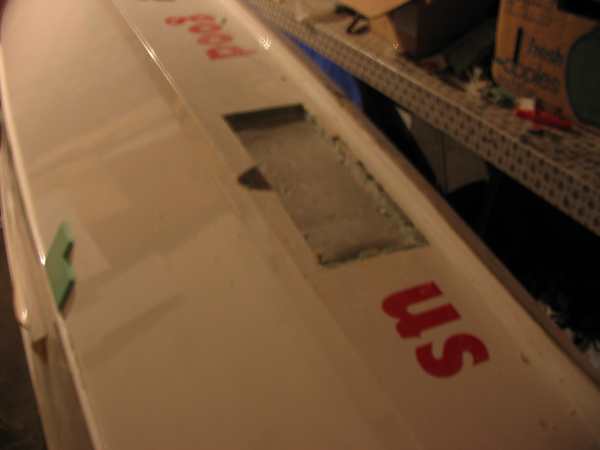
| The impact punched a large break through the foam sandwich: |
 |
A closer view, with the green foam visible. |
 |
Monday night, 24 Jan 2005
|
The boat was brought home on Sunday afternoon. On Monday evening, thanks to the muscles
of Dan Murphy, the boat was installed into our garage. The boat on its side in the
garage: |
 |
The impact has broken through the foam sandwich and allowed water into the port side tank. |
 |
A bit of a mess! |
 |
I rang Guy Winder (he built the boat) on Monday. "I need some foam to repair a hole
in my boat, please" I said. "Can you not use a bit of filler?" he
asked. "No," I replied, "I need a piece of foam 7 x 14
inches." "Ouch" he said.
The impact was much like a bullet: A small entry hole, as above, but a much larger exit
wound. The foam is separated from the sandwich for a very large area inside the hull
which cannot be seen in the pictures.
Stay tuned, serious surgery required. |
Tuesday night 25 Jan 2005
|
| We play at being the dentist -- cutting out decay! We used a
Dremel
hand tool with a high speed cutting disc to cut away the broken and de-laminated bits.
Well, most of them. A small piece at the top is still loose. It will be glued and
clamped back together. The timber panel at right is part of the aft cockpit
structure. Remember, this is the port side tank we have opened up. |
 |
Here is an overhead view, with the Dremel tool, a great yoke for many jobs to do with small
boats. |
 |
If you ever wondered what the inside of a port side tank looked like, well, here you are.
We simply held the camera inside and clicked. At the top, you are looking out through
the hole we opened to the light on the garage ceiling. Gotta get the Hoover in to
collect all the dust. |
 |
To provide a structure for the repair, we create a "blind backing piece." This
is a sheet of single ply glass fibre cloth, hardened with epoxy resin. Tomorrow, when it
is cured, we will cut the sheet to size and glue to the inside of the big hole we cut out.
We will use the surface of the backing piece to build up the repair with foam and more glass
fibre.
To make the blind backing piece, we used a fibreglass cloth. We mixed up a small
quantity of epoxy resin with a bit of filler powder. We put the glass fibre on a plastic
sheet (epoxy doesn't stick to plastic) and used an old credit card to spread the epoxy into
the glass fibre. When dry, it will be a stiff sheet of GRP. And yes, that's the
kitchen table. |
 |
Tune in tomorrow! |
Wednesday Night 26 Jan 2005 --Make the blind
|
|
Here is the blank backing piece, cured from yesterday--glass fibre reinforced with epoxy
resin.
It will be cut to size to fit inside the wound. |
 |
|
The backing piece has been cut to size with scissors to fit inside the wound, with an inside overlap. |
 |
|
Spaghetti Junction!!!
The blind backing piece has been coated with epoxy resin along the four edges. The
yellow strings run inside and out of the backer and serve to pull the piece of GRP up and tight against the inside of the hull. Once
dry, it will serve as a support for new foam, a top layer of GRP, and then gelcoat, thus
completing the repair. It is important that a strong glued joint is made between the backing
piece and the inside of the hull. |
 |
|
The South Australian Cab Sauv provides much needed support and advice. |
 |
| |
| Tomorrow: we fit the foam and the top layer of GRP
to complete the laminate. |
Thursday night, 27 Jan 2005 -- Rats!
|
Best laid plans and all that... no foam for the sandwich. And the flash is not working
on the camera.
Here you can see the blind backer in place, after all the strings have been cut away. |
 |
We use the Dremel tool, which is a kind of angle grinder, to cut away a perimeter of
gelcoat/grp to provide space and room for the overlay sheet of fibreglass which will cover the
foam, to make the sandwich. |
 |
Here you can see a strip of gelcoat/fibreglass which has been stripped off of the sandwich.
The next step is to cut the foam to fill the hollow, and cut a piece of glass fibre to cover
the foam and around the perimeter, thus locking the sandwich in place. |
 |
We need to laminate, on Friday night (normally date night number one) the foam to the backing
piece, and the fibreglass on top of the foam. Gelcoat on Saturday morning, sand smooth
on Saturday afternoon, (then date night number two) and trailer the boat Sunday morning.
We need a hand or two to get the boat out of the garage and onto the trailer on Sunday
morning. Any offers?
Tonight's support and advice: Peter Lehmann Grenache 2001. |
However, there is always something worse:
|
| Here is a J-29 which was wrecked on the highway on the way to Key West
(Florida) Race Week a fortnight ago. Note the skidmarks on the road. |
 |
Here is a Hobie 33 which was involved in a road traffic accident last week en route home from
the Key West Race Week to its home in Chicago. A total mess, a destroyed boat. |

|
Friday night, 28 January 2005 -- The big build
|
|
Tonight, we forgo the fillums and get stuck in on the laminate assembly. First, we
need a paper template for the sheet of foam. A piece of paper will do the trick --
measure it twice and cut it once! |
 |
|
Can't find the Stanley blades, so this steak knife will do nicely to cut out the foam from
the template. Noel Butler gave us a piece of foam because the sheet ordered from Guy Winder
did not arrive. THANKS NOEL!!!!
We need to use two pieces, butt jointed together, to do the job. |
 |
|
The foam fits the void, note the piece of tape orienting it to the bow, because our hole is
not a perfect rectangle. |
 |
|
Next, we make another larger paper template for the glass fibre overlay, the outer part of the
sandwich. It needs to be a perfect fit. |
 |
|
We are using a standard cross weave glass fibre woven cloth. 90 grams per square
meter. We are careful to cut the piece on the bias, lest the straight edges unravel, as
you can see at bottom left. It causes a bit of waste, but then, we've always liked the
sound of breaking glass. |
 |
|
The masking tape helped to ensure the glass fibre did not skid under the template while
cutting with a really sharp pair of scissors. Again, the piece of glass fibre has a bit
of tape to orient it toward the bow, lest we get confused. A small piece of cloth like this
must be handled very carefully because it can easily be stretched out of shape. |
 |
|
Checking to make certain it fits exactly into the cutout. |
 |
|
The laying up process is always very messy, no matter how careful we try to be. So,
copious amount of insulating tape will protect the hull from any epoxy ooze. We don't
want to waste time tomorrow cleaning up any overspill! |
 |
|
Let's get chemical: Four parts resin, one part hardener, two parts filler
powder. We use the large syringes to draw out measured amounts from the tins, and a
teaspoon to guesstimate the powder, all mixed with a leftover tongue depressor. And yes,
it is still the kitchen table. |
 |
|
The two sheets of foam have been glued into place, using an old credit card as a spatula to
spread the epoxy and force it into any voids. |
 |
|
Time out for dinner: cod with parmesan cheese coating, green beans, lovely
spuds, glasses of wine. It is Friday!
|
|
Next, the ready cut piece of fibreglass cloth is laid into place. As the epoxy is
squeegeed into the cloth, the cloth becomes transparent, showing a good bond. |
 |
|
The overlay cloth has been fully wetted out. The gouge at centre left has been filled
with thickened epoxy. |
 |
|
Now the trick o' the trade. The sandwich of foam, glass and epoxy needs to be
compressed to form a perfect bond. We don't have access to a vacuum bagger, which would
do the trick. So, a bit of lateral thinking is needed.
We have a sheet of 1mm white mylar plastic, which will not stick to the epoxy. Using the
template, it has been cut to shape and placed on top of the sandwich.
Take a deep breath! |
 |
|
Another, larger piece of mylar plastic is placed on top, then a couple of sheets of the
Guardian newspaper, then a length of four be two, then a heavy stone from the garden.
The weight should serve to compress the entire sandwich. When disassembled tomorrow, it
should leave a 1 mm void to be filled with gelcoat.
This technique, though a bit rough looking, saves a considerable amount of sanding prior to
application of gelcoat, which in turn needs to be sanded. ROCK ON! |
 |
|
Tonight's advice and support from Bosquet Canet, a just barely okay cab sauv from the Lyon
region. Background music was Allman Brothers "Brothers and Sisters" and
the Police "Regatta de Blanc." Showing our age perhaps.
All done at 10.30 pm.
|
Saturday, 29 January 2005
|
|
Heading to the finish line, today sees clearing the surface, application of gelcoat, let it
dry, sand it smooth.
Here the hard rock and the covering mylar have been removed along with most of the tape.
A quick bit of sanding is needed to roughen the glass surface to provide good gelcoat
adhesion. |
 |
|
Here is another look at the wound, ready for gelcoat. |
 |
|
More insulating tape is applied to provide a run off for the gelcoat. When the gelcoat
is partly cured, the tape and overflow can be easily removed by peeling away the tape. |
 |
|
The gelcoat is curing, We used a piece of plastic to draw the gelcoat smooth - ish. |
 |
|
After a quick run with the small electric sander, wet and dry sandpaper on a good sanding
block is your only man. A bucket of water with a bit of wash up liquid added, makes for
a quick smoothing, although much elbow grease is needed. |
 |
|
Finished. There are a few cosmetic blemishes in the gelcoat, but we will finish those
with spray paint in the break between Frostbite and Summer Season. The boat is ready to
race tomorrow! Go Lulu go! |
 |
|
Good tools are important. At right is the Dremel tool, for grinding, cutting and
sanding. At left is a small orbital hand sander marketed as a
"Sandcritter." You can get them both at the B&Q. Not expensive. Tell
them Ellen McArthur sent you! Good quality electrical tape from the local shop. |
 |
| Supporting music during the day: Flying Burrito Brothers, The Who Live at
Leeds, U2 How to Dismantle an Atomic Bomb, Tom Petty's Full Moon Fever. Support and
advice (after 6pm) from a very nice Italian Villa Antinori.
Tomorrow morning we will wiggle the boat out of the garage, on to the trailer and off to
Dun Laoghaire. We'll be back in the races on Sunday 30 January. Do not touch.
|
Sunday Morning, 30 January 2005
|
|
Dan Murphy kindly arrives at 9.30 to help get the boat out of the garage. Flippin'
flash doesn't work. We follow this early exercise with a full Irish breakfast of scrambled
eggs, rashers, sausages, toast, tea and the odd croissant. |
 |
|
Here is the boat ready to be packed up for the quick trip to Dun Laoghaire and away to the
races. Go back to the first picture in this series to see the original damage. |
 |
|
So, after all that work and effort. did our heroine win today's race? Did she feature
at the top of the fleet?
No.
On the first reach, the Seasure gudgeon broke on the rudder stock.
Can I fix it? No, but she can buy a new one.
|
 |
| Travelling Wilburys. At the end of the line -->
Go Back to Boat Maintenance
|


