|
|
"Hey Houston! 14894 has problem"
|
| 19 December 2005 A Frostbite collision at a mark rounding, the damage is on the port bow. This is
a two year old Winder Fireball dinghy.
The boat is brought into
the garage, and laid secure on its
starboard side to allow easy access to the portside bow.
|
| The impact punched a large break through the foam sandwich: |
 |
| A Dremel tool with grinder attachment is used to cut through the outer gelcoat and glass
skin to expose the damaged foam core. |
 |
| Sliced all round, ready to pick apart. I keep inside the quarter chine, work on that
part later. |
 |
Part of the foam sandwich has delaminated from the inner Kevlar layer. The impact stretched the Kevlar and popped
it inwards. In one sense, the Kevlar has done its job by preserving the water-tight integrity of the forward
compartment. But, because it has stretched a bit inwards, it is no longer stiff enough to use as a surface to rebuild
upon. And it's a bit surprising to see that area of delamination, given that the boat was built with pre-preg
material. |
 |
| No choice but to cut out all of the Kevlar and make up a blind backing piece.
Always worth a peek inside. The stainless steel strip you can see is the inner end of the jib tack, bolted to a
kevlar-foam sandwich upright. You can also see a plywood stringer panel. |
 |
| Here is a sketch showing a section of the hull construction, outside of hull at top, inside
at bottom. |
 |
The repair requires a "blind backing piece" to be made of grp. Here is one I made earlier, needs to be
trimmed to shape. |
 |
We'll use this hot air gun, on its lowest setting, to dry the area. Take great care with a tool like this, you
could melt the boat back into its constituent chemicals!It has taken 20 minutes to get to this point. Music by
The Rolling Stones "Sticky Fingers."
Time out for lunch (cheese and chicken sandwich, loadsa mayo, some French mustard, some dill pickle, cup of nice coffee,
four Oreo chocolate cookies). |
 |
The blind backing piece has been cut to size. Holes drilled and string attached to pull it in to place. |
 |
I'll use west epoxy resin, with their 205 Hardener, for use in low temperature. Thicken with 403 microfibres to
help bond and gap fill. The mixing vessel is a grey cap from a can of spray paint which has a uniform side
diameter. Epoxy and hardener needs to be mixed in a 5:1 ratio, either by weight or by volume. With a straight
sided mixing vessel, it is easy to use a coffee stir stick (liberated from a coffee shop) which is marked with a 10mm
line and a 12mm line. (Look closely).
Put the stick upright in the vessel, add resin to the 10mm line then add hardener to the 12mm line and c'est voila, a
proper 5:1 mix. Gloves keep my fingers from sticking to the stereo. And yes, that is the kitchen table. |
 |
Inside the wound, there is a perimeter of delaminated Kevlar. I used a syringe to inject thickened epoxy (mayonaisse
consistency) into the gap between the Kevlar and the foam. Then I added more Micro fibres to my mix (slightly less
than peanut butter) and used my gloved finger to load up the inside edges of the wound.
Change gloves, insert the blind backer, pull tight and tie off to ensure good adhesion to the inside of the hull. Sorry,
I didn't have a third hand to photo step by stepWhen the epoxy has cured, all of the strings will be cut away and we
can begin to laminate foam and an outer layer of e-glass and then gelcoat. |
 |
| The strings are tied off to the chest freezer. Use whatever tools are at hand. |
 |
| Okay, that part is done, there are a few other small nicks to deal with. This is
where the transom mainsheet bridle is tied to the portside gunwale. Apparently a construction goof, pressure on the
bridle has crushed the deck and expose the underlying foam. |
 |
| Using the Dremel tool fitted with a cone shaped grinding stone, it is easy to clean out the
crushed area and create a tapered well. The Dremel is a brilliant tool, grinding in seconds what would have taken
15 or 20 minutes with a manual round file. |
 |
| Tape is used to protect the surround area, some plastic is wrapped around the bridle (can't
undo the knot!) to protect it. Thickened west is dabbed into the wound and a hinged piece of mylar is used to
flatten it off. A small straight edge is used to form the epoxy in place and guide any excess onto the tape, thus
saving some sanding time when dry. |
 |
| That's it for today, Monday, an hour of work, with lunch in the middle! |
|
| The next morning....
All of the strings have been cutaway, the blind backing piece is securely epoxied in place, ready for the next step.
|
 |
| The edge of the wound has been masked with electrical tape to protect against the
inevitable epoxy overflow in the next step. Epoxy will not stick to tape, or plastic, or mylar or acetate sheeting.
The newspaper is in place to soak up any overflow. A piece of foam has been cut and shaped to size. |
 |
| Okay, I know this looks a bit alarming, but bear with me. The blind backer has been
coated with thickened epoxy, mayo consistency. The back side of the piece of foam has also been coated. The
foam was offered up into position and pressed home by hand. But, a constant pressure needs to be applied as it
cures. I'm not gonna stand there all day, I don't have a vacuum bagger, so I use a bit of lateral thinking.
A piece of wood, similar in shape to the foam piece is encased in a sandwich bag (all together now: "Epoxy doesn't stick
to plastic!") A length of eff off shock cord has been tightened around the bow and a cork sanding block added to
increase the pressure. This ensures a tight glue between the blind backer and the foam sheet. |
 |
| Eight hours later, the epoxy has cured a bit, the tape and paper protection cleared away
and the foam is ready for tomorrow's layup of glass fibre. |
 |
That's it for Tuesday, 30 minutes of work, 24 hours of cure time! Music was the Allman Brothers: Brothers and
Sisters.
NB: Bought Afloat magazine after doing this bit, wherein the owner of this boat is described as
"possibly Ireland's most eager sailor." |
|
Today we lay glass. First, use the Dremel tool with grinder wheel to trim away the outer gelcoat / grp layer
around the perimeter of the wound. It is important to provide an overlap of new glass. I have also opened
up the crunched portion on the quarter chine, at top left. Interesting to see along the left side the white
filler used at the bow / deck joint, where the foam layup ends. The repair needs two sheets of glass on top of
the foam filler sheet, then a third piece to overlap the whole lot. |
 |
|
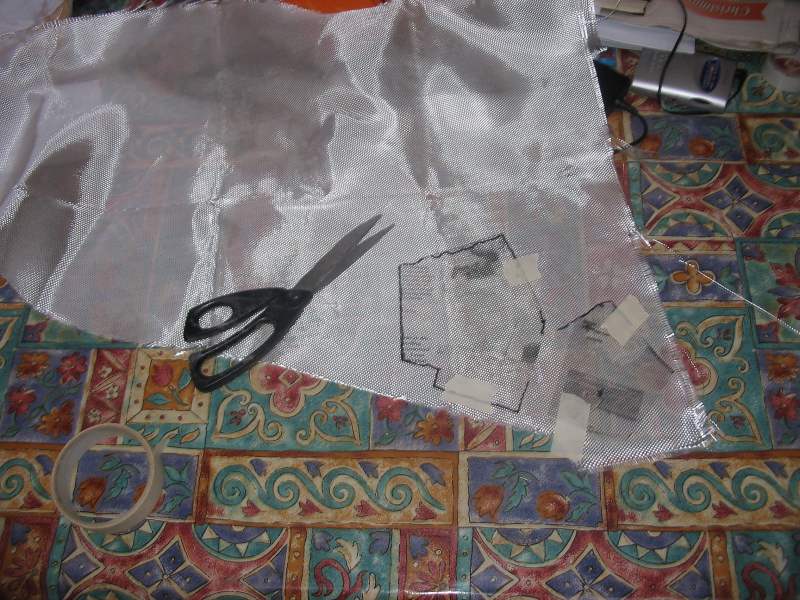
I use acetate (mylar) sheeting to trace the wound and the overlap. I get the acetate from a friend in
the print business--print film to be disposed. I use 200 gsm close weave cloth specially designed for use with
epoxy, rather than polyester resin, known as e-glass. The repair area is slightly more than an A-5 sheet of paper
in size. Thus, the new glass is approx 6 grams in weight. I tape the tracing on the cloth, then cut with a
really sharp scissors. |
 |
|
Tape is used to mask off the adjoining area. The quarter chine wound has been filled with thickened
epoxy and the first layer of glass has been applied. |
 |
|
Here the second and third layers have been laminated. They are invisible! |
 |
|
Pause for a cup of coffee. Unlike polyester, epoxy resin takes a long time to cure. After 30
minutes, a layer of plastic (cut up Zip lock bag) is attached to the wound. I need a means of compressing the
three layers of glass and squeeze away excess epoxy. With the plastic in place, I use and old credit card,
working from the centre outwards, to laminate the lot. Excess epoxy is forced onto the surrounding tape. |
 |
|
Lastly, to ensure constant compression during the cure, I rig up the eff off shock cord, a piece of white
plastic sheeting cut to the size of the entire wound, and a block to put it all under pressure. You can just see excess
epoxy oozing out to left, right and below. Leave it for 24 hours. Time to go to town and a bit of shopping.
The majority of this hour has been spent in preparation, taping, cutting, gathering materials. The lay-up takes
five minutes. |
 |
|
|
|
 |


